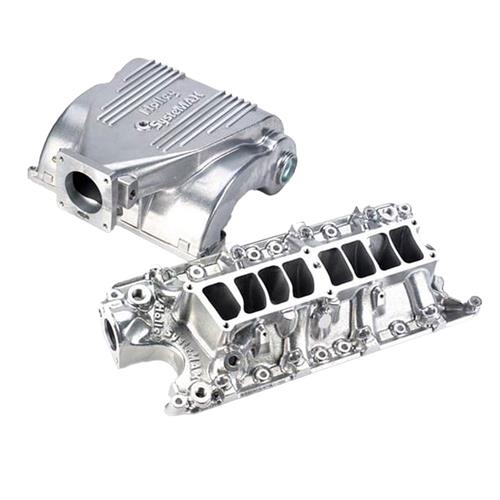
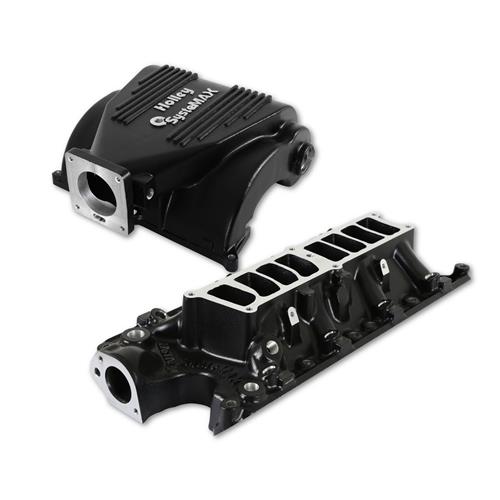
Add some serious horsepower, and torque to your 1986-1993 5.0L Mustang, all while adding some under hood styling with the Holley SysteMAX Intake Manifold!
Spring lock coupler disconnect tool for fuel lines
1/2" standard & metric socket sets
3/8" deep standard & metric socket sets
3/8" standard & metric socket sets
Standard & Phillips screwdrivers
Gasket scraper
Oil filter wrench
Hammer
Removal of Engine Accessories
Disconnect the negative cable from the battery. Secure the cable to prevent accidental grounding
Drain the coolant from the radiator. Remove the black drain plug to drain the coolant from the block
Disconnect, and remove the mass air flow sensor, and duct work
The fuel pressure must be released prior to disconnecting the fuel lines or hoses. Remove the Schrader valve cap from the fuel pressure port. Attach a fuel pressure gauge to the Schrader valve. Release the fuel pressure through the gauge, and into a clean metal container. Use the spring lock coupler disconnect tool to disconnect the fuel lines
Carefully mark all linkages, and cables before removal
Carefully mark, and disconnect the vacuum hoses connected to the upper, and lower manifolds
Identify, and mark each plug wire, and the cylinder designation on the block. Leave the spark plug wires attached to the distributor cap, and disconnect the spark plug wires from each spark plug. Position them to avoid interference in the manifold removal, and installation
Remove the coolant hoses from the upper, and lower manifolds
Intake Manifold Removal
Remove the cover from the top of the upper intake manifold to expose the center bolts
Remove the 6 bolts, and lift the upper intake from the lower intake. Some models have a support bracket on the rear of the upper intake assembly. This bracket must be removed to separate the upper intake manifold from the lower intake manifold
Unplug the electrical connections from the sensors, and the injectors located on the lower intake manifold. Keep the wiring harness out of the way by tying it to the firewall
When disconnecting the coolant lines from the heater at the firewall, be sure to twist hoses before removal to reduce the chance of any heater core damage
Remove the upper radiator hose water neck and thermostat. The water neck, and a thermostat will need to be installed on the new intake manifold
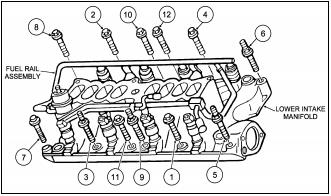
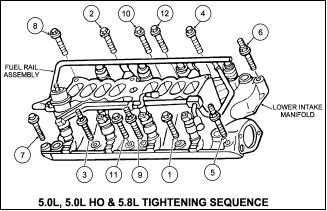
Loosen the lower intake manifold bolts a 1/2 turn in REVERSE of the torque sequence shown below (Starting with number 12, and ending with number 1) After loosening all the lower intake bolts, the bolts can be removed
Remove the lower intake manifold, and place a clean shop rag, or towel over the engine valley to prevent dirt, and contaminants from getting into the engine
Before cleaning, stuff the intake ports with paper towels, or shop rags
SysteMAX Lower Intake Installation
Be sure all gasket surfaces are clean, and free of oils, and cleaning solutions. Wipe the gasket surfaces with a clean shop rag to remove and contamination. Remove port stuffing, and valley rags
Remove the water lines, sensors, fuel rails, and plugs from the lower manifold
Remove the injectors from the original manifold
Install the EGR heat shield and the PCV splashguard to the SysteMAX II lower manifold using the rivets provided. You can lightly tap in with a hammer.
Install the PCV screen filter in the new lower manifold
Install new intake gaskets on the cylinder heads. If the front, and rear seals do not have an adhesive backing, it is recommended that you use a thick bead of RTV silicone sealer instead of the gasket
If you are using the front, and rear end seals with the adhesive back as the front, and rear seals, apply a small amount of RTV silicone sealer in the corners where the cork gasket and intake gaskets intersect. Follow the instructions on the sealer before assembling
Apply a small amount of anti-seize compound to each intake bolt, and install
Torque the lower intake bolts in the sequence shown below. Torque the lower intake bolts to 15 ft./lbs., and repeat the torque sequence to a final torque of 22-24 ft./lbs
Install new O-rings on the original injectors. Install the injectors in the new manifold
Install the water lines, sensors, fuel rails, and plugs that were removed from the old manifold
Install the fuel pressure regulator from the old manifold on to the new manifold
Install the thermostat, and water neck outlet removed from the original intake manifold with a new gasket. It is highly recommended that a new thermostat be installed during this procedure. Use an anti-seize compound on the bolts securing the water neck. Torque the water neck bolts to 30 ft./lbs
Plug any unused ports on the manifold
Reconnect the wiring harness to the injectors and sensors on the lower manifold
Reconnect the fuel lines, ensuring the connections snap together tightly. Reattach the safety clamps to the lines. Double-check to ensure all lines are properly connected, and secure
Check the condition of the bypass hose, and heater hoses, and replace if necessary. Connect the bypass hose, and heater hoses, and then tighten securely
SysteMAX Upper Intake Installation
If your SysteMAX manifold is equipped with an internal EGR passage, and the side of the lower intake manifold has a large drilled, and tapped hole on the side, plug it with the supplied 1/2" pipe plug
Using the gasket provided, install the upper manifold to the lower manifold. Torque to 12-18 ft./lbs
Remove the 4 nuts that secure the throttle body and EGR spacer to the stock or old upper intake manifold. Remove the throttle body, and EGR spacer
Remove the 4 studs from the old upper intake manifold
Install the 4 studs removed from the old upper intake to the new SysteMAX II upper intake
Install the gasket, and the EGR spacer onto the studs
Install the gasket, and the throttle body onto the studs
Install the nuts, and torque to 20 ft./lbs
Reconnect the throttle linkage. Check for any binding by opening, and closing the throttle completely. If ANY binding is present, do not proceed any further until it is corrected
Install the 3/8" vacuum fitting (straight fitting) on the front side of the upper intake
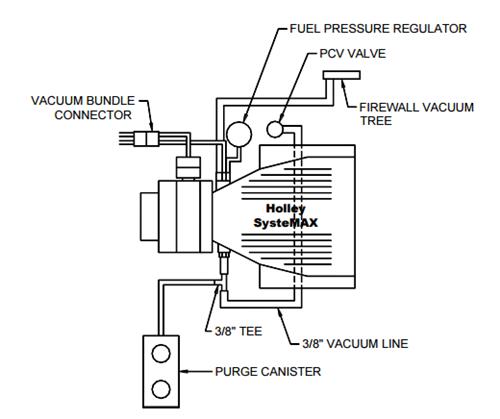
Using the picture below as a guide, connect the vacuum lines to the upper intake manifold. Some trimming, or extension of the vacuum lines may be necessary. Connect the lines from the vacuum bundle connector to the EGR valve, and the ports on the back of the manifold. Connect the fuel pressure regulator and large line from the firewall vacuum tree to the back of the manifold. Connect the PCV valve, and purge canister to the front of the manifold using a 3/8" vacuum line, and the supplied 3/8" Tee
Connect the coolant hoses to the EGR spacer. Securely tighten all clamps
Install the air intake hose and mass air flow sensor, and reconnect all electrical connections. Securely tighten all fasteners
Installation of Engine Accessories
Reconnect the coolant hoses from the upper, and lower manifolds
Fill the radiator with a 50/50 anti-freeze, and water mix
Inspect the air filter element at this time. Replace, if necessary
Drain the oil from the crankcase, and remove the old oil filter. Be sure, and drain the oil by removing both drain plugs. Reinstall both drain plugs. Install new oil filter, and refill the crankcase with fresh motor oil to the manufacturer's specifications
Reconnect the spark plug wires to their correct cylinder designation ensuring to route the wires away from any direct sources of heat
Starting The Engine
Reconnect the negative battery cable to the negative battery terminal
Turn the key on a few times to allow the fuel pump to operate and purge the lines of air. Check for fuel leaks at this time. If any fuel likes are present, do not attempt to start the engine before repairs are made
If the area is clear of fuel and/or fuel vapors, start the engine. If the engine turns over excessively or backfires, stop and recheck ignition timing
After the engine starts, remove the shunt plug from the distributor, and set the ignition timing to the specification found on your underhood decal, usually 10 Degrees BTDC, with a timing light. Tighten the distributor old down bolt. Reinstall the shunt plug
After install startup, and the engine reaching full operation temperature, shut the engine down, and allow it to cool for a minimum of 8 hours. Re-torque the lower intake manifold using the sequence in the picture below. Re-torque the throttle body nuts at this time
Installation instructions provided by Holley Performance Products
Holley Systemax Intake Manifold - SilverThe Holley SysteMAX intake is designed to be one of the highest-performing street manifolds on the market for the popular Fox Body Mustang! Bolt-on maximum horsepower, increased torque, and solid powe
Read More
Holley Systemax Intake Manifold - Black The Holley SysteMAX intake is designed to be one of the highest-performing street manifolds on the market for the popular Fox Body Mustang! Bolt-on maximum horsepower, increased torque, and solid powe
Read More
About the Author
Jay has written content for Late Model Restoration for over 10 years, producing over 120 articles. Jay has an extensive 25-plus-year background in automotive and is a certified Ford Technician. Read more...