Installation Instructions for 79-93 Short Pinch Weld Covers
Read all instructions before beginning work. Following instructions in the proper sequence will ensure the best and easiest installation. Set aside 1 hour per side.

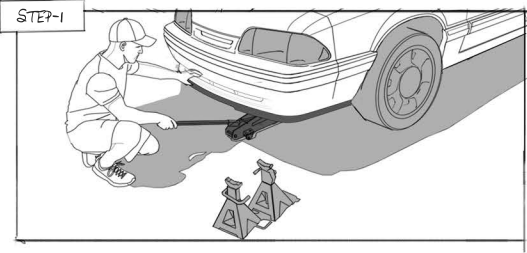
- Place the vehicle on a level surface. Jack up the vehicle and place it safely on four jack stands high enough that you can lay and move comfortably under the vehicle (before installation begins - please read the “Possible Issues” box at the bottom of this page).
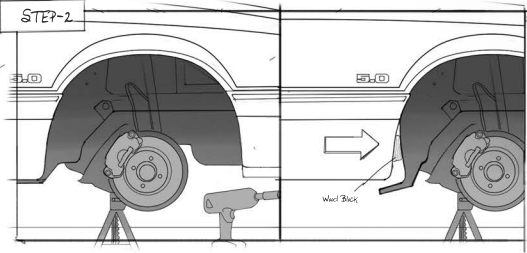
- With the vehicle securely in the air, remove both front wheels to access the lower half of the front wheel liners. Using a Phillip screwdriver, remove the mounting screws holding the liner to the vehicle. Push the wheel liner's lower portion towards the wheel opening's center. Use a wood block to keep the liner away from the lower fender. You will need this space to dry-fit the Pinch Weld Covers to the lower rocker and trim the wheel liners (Step - 6).
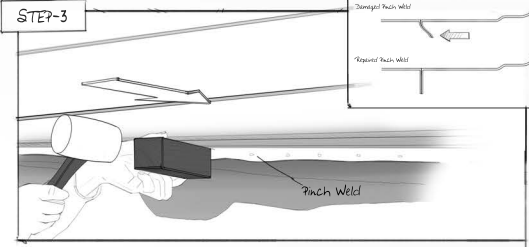
- The Pinch Weld Covers are designed to be mounted to the lower rocker, not the actual pinch welds. This is because most of the pinch welds on our cars have been beaten up by years of abuse. Take this opportunity to repair the pinch welds. Using a wood block and mallet as illustrated above, place the wood against the damaged pinch weld and hit the wood until the pinch welds are perpendicular to the ground or the pinch welds have been massaged enough that they no longer affect the installation of the Pinch Weld Covers. While fixing the pinch welds, it might also be necessary to massage the lower part of the front fender to allow the Pinch Weld Covers to sit flush; this will be obvious during the dry fit. If the lower fender needs to be massaged, use a wood block and mallet as you did on the pinch welds. Take care not to damage the fender.
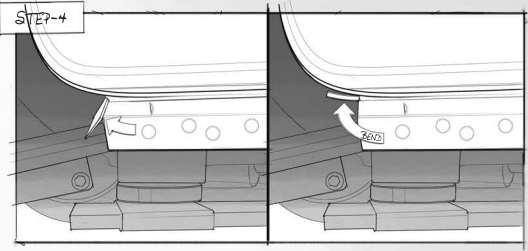
- The next step is to bend the rear pinch weld tab up and away from the lower rocker. (see arrow in illustration). This tab can easily bend using a wood block and a mallet; take your time to make sure you don't hit the lower rocker with the mallet. A few hits with the mallet should do the trick. You will know if the tab has moved enough by completing step 5.
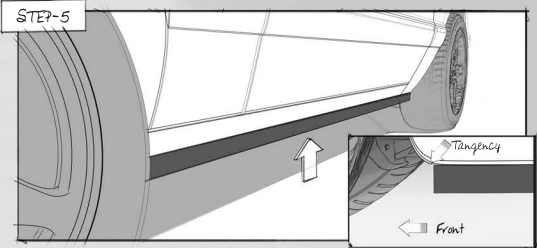
- Once the rocker is repaired, the fender is massaged, and the rear pitch weld tab is folded away, the next step is to dry fit the Pinch Weld Cover. The best way to get started is to align the front edge of the Pinch Weld Cover to the tangency of the lower front fender. (see arrow) You may quickly notice that the Pinch Weld Covers do not sit flat against the lower rocker. Because of the abuse these rockers have endured over the years from jacks, a high percentage of our cars do not have straight rockers.
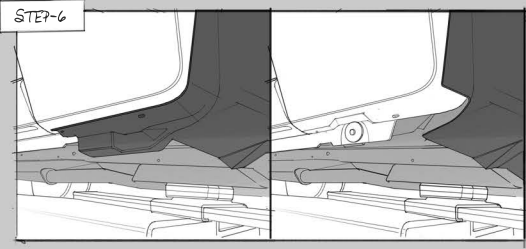
- With the dry fit complete, remove the wood block holding the wheel liner back and lower it back into position. Hold the Pinch Weld Cover in place to determine the amount of liner that needs to be trimmed. In the above illustration, you can see how the trimmed liner should look after trimming. During this step, make sure that only enough material is removed. It's okay to remove small amounts of the liner at a time, then dry fit the Pinch Weld Cover again to check fitment between the liner and Pinch Weld Cover. Repeat this step as many times as needed to ensure proper fitment between Pinch Weld Cover and liner.
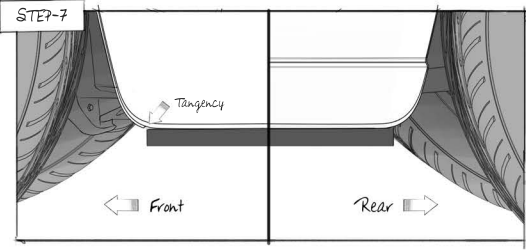
- At this point, the Pinch Weld Cover should be ready for final installation and alignment. As in the previous dry fit ( step 5), align the front of the Pinch Weld Cover with the tangency on the lower fender ( see arrow). Take your time to ensure the Pinch Weld Cover is aligned with the vehicle. Use the above illustration to help you identify proper alignment.
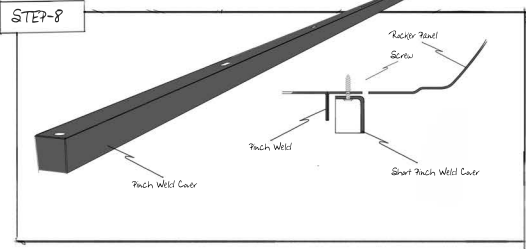
- Cross section view.
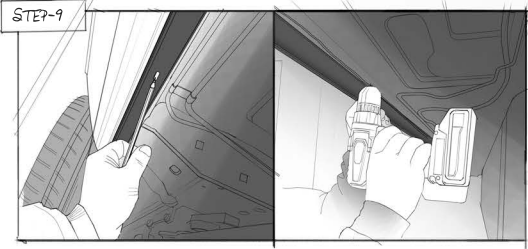
- Once the Pinch Weld Cover have been aligned, mark the screw hole locations on the rocker with a marker, on dark cars use a paint pen or apply tape to the body before final alignment to have a surface to mark. Once holes have been marked, grab a drill and a 1/16’’ drill bit. Starting with the outer two holes, drill 1/16’’ holes into the lower rocker and then drill the remaining three center holes. Take your time with this step since there is no going back.
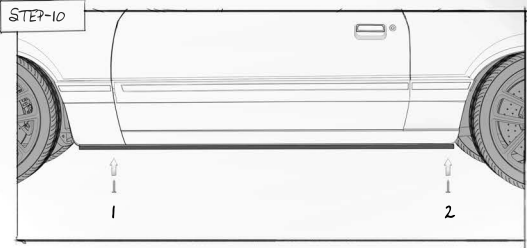
- Continue by realigning Pinch Weld Cover to the body and installing the outer two screws only, indicated by a 1 and 2. The outer two screws ( 1, 2) should be tightened until snug, but do not over-tighten, or you could potentially strip out the 1/16’’ holes you created.
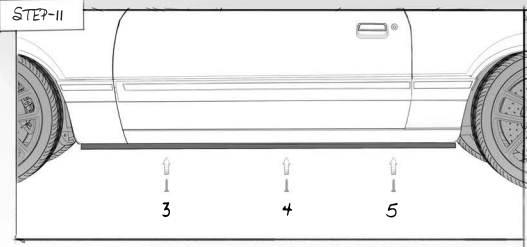
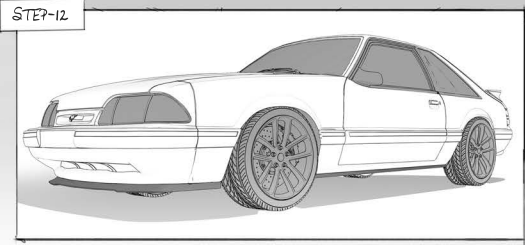
- Once these screws are tight, you can continue with installing the three center screws 3, 4 & 5. Now that screws 1-5 are in place, step back to see how the Pinch Weld Covers look on your vehicle. Make any needed adjustments before moving on to the other. Pinch Weld Cover. Repeat steps 1 - 12 on the opposite side of the vehicle to complete the installation of both left and right Pinch Weld Covers
- Both Pinch Weld Covers should be aligned and fully mounted to the car by this step. Using a floor jack, lift the vehicle from the jack stands and safely lower the car back to the ground. Wipe any fingerprints from the Pinch Weld Covers using a soft microfiber cloth. I hope you are happy with the new look of your car. Please get in touch with us at any time with installation questions.
Possible Issues
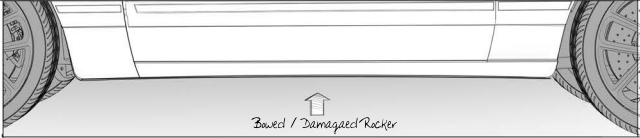
Because of our cars' age, it's very common that the lower rockers and pinch welds have seen their fair share of abuse. Pinch welds can be so beaten up that they lay flat against the rocker. Some rockers are bowed upward, as seen in the image above. Take a moment before starting the installation to assess the condition of your car's lower rockers and pinch welds. Using a long straight edge will help you quickly identify the condition of these parts. Don't get discouraged if your rockers are bowed or the pinch welds are damaged. A moderate amount of distortion is acceptable, meaning your Pinch Weld Covers will still mount correctly.
 NOTE: PINCH WELD COVERS ARE FOR STYLING PURPOSES ONLY AND SHOULD NOTE BE USED AS JACKING RAILS. DOING SO WILL DAMAGE THE PART